Showing posts with label how to practice drawing. Show all posts

Saturday, April 29, 2017

Looking At Progress

By Elissa Rosenthal

Hello, Everyone! For this week in my artistic journey I decided to redo one of my old sketches, as well as brush up a bit on drawing hands.
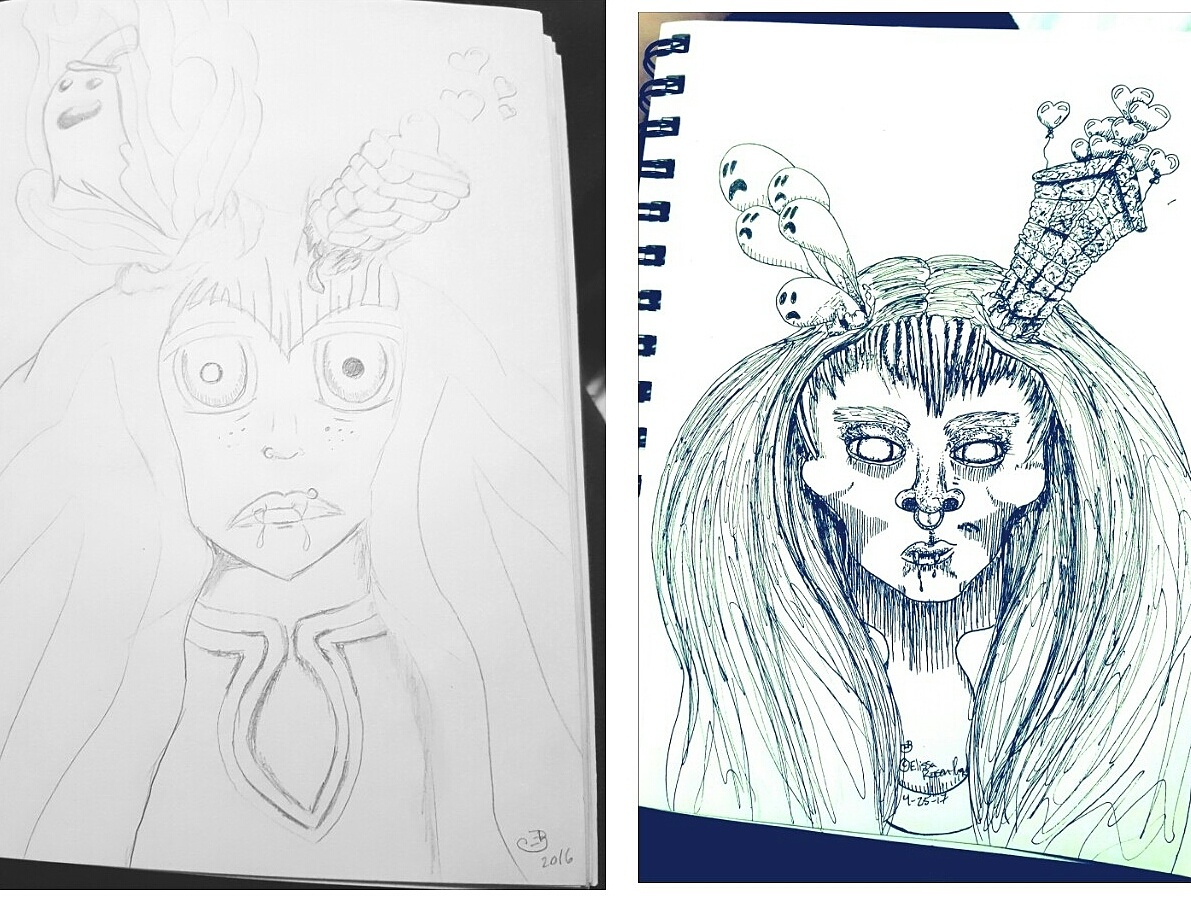

The image on the left is one I did in 2016. I remember not being satisfied with the way it turned out, because I wanted it to be a bit more on the creepy side and not just weird. At the time I did not know much of anything about perspective, so there is not even a sense of trying to get the angle of the brickwork correct. Plus, to me the "ghost" on this one looks a little too friendly.

The image on the right is the redone version of the other image and I personally enjoy it a lot more. It has the creepiness I originally wanted in the previous sketch, and the brickwork looks a lot better.

Where I took inspiration for this idea was by looking on YouTube. I was seeing a lot of people redoing their old artwork and I thought it was a really good idea! When you are focused on how you are drawing now, it is sometimes really hard to see any improvement, but with this exercise your improvement is easier to see.

I as well worked a little on drawing hands. Hands, at least to me, are one of the hardest things to draw. Hands and feet. It must have to be because of all the little parts that are effected by the other little parts, and how they brush, push and pull against each other in so little amount of space. At least, this is my theory.


The way I draw hands has some set backs, as I have been seeing recently. I have a tendency of drawing hands by doing the finger I see the most of first and then the rest of the hand. I am starting to think, maybe I should try boxing the outer shape of the hand first, and then worry about the details. This would maybe fix the problem of sometimes the hand being bigger than I expected, like with the fist on the bottom left. With this hand I thought I would have room, and then I did not have enough room for the thumb.

I hope that you enjoy my art and these postings!

If you wish to follow me on social media:

👉FOLLOW ME ON TWITTER @TheElissaPost: HERE

👉LIKE MY FACEBOOK FAN PAGE: HERE

👉FOLLOW ME ON INSTAGRAM: HERE

👉FOLLOW BY EMAIL BY PUTTING YOUR EMAIL INTO THE FOLLOW BY EMAIL PLUGIN.

Saturday, February 18, 2017

The Art of Eyes : Distortion and Shading Practice

By Elissa Rosenthal

Hi everyone! For this week I decided to keep up with practicing drawing the eye and while doing so I've learned some little tricks for helping to correct some errors. 

1) I found out how you can use photography to your advantage! 

This may not work in all settings since I'm drawing from a photograph, but what I found helps is while I'm drawing to take photos during some pauses in the process to see how I'm doing. This little tip helped me figure out the next one as well.

2)Try to look as straight on to your subject and your paper since, if you don't, it can end up becoming distorted. 

From my own experience this is because your eye is seeing your subject at a different angle, same as your paper. This can make it where you can end up drawing lines too long or too short, among other possible distortion issues.


I found out the distortion that was happening after I took my first photo (shown above). I saw that I had made the end of the eyelid- near the tear duct- too close to the tear duct and at a too drastic of an angle.

Then, once I took my next photo, I found out I had made the pupil a little too small to the right, so I fixed it as best as I could at the time. 
Once I had taken what I considered my last photo of this eye I had been working on, I remembered three more tricks I wanted to share. 

1) Drawing in the same direction the whole time makes the image look more natural and gives it less unnecessary texture. 

2) Blending with a paper napkin works better than blending with a piece of computer paper.

3) You can over blend.


In the picture shown above is my form study I did since I had enough time to do it this week. A way I found to help with not using guide lines in the shadow -since it's so light in value- is to lightly shade in the general area and erase what doesn't need to be there. 

Thank you for reading my blog! I really do appreciate it! If you want to ask me any questions directly related to this post you can comment in the comment section below and I will try my best to answer. 


DO YOU WANT TO KNOW WHAT ELSE I'M DOING AS WELL AS KEEP UP WITH THIS BLOG?

👉FOLLOW ME ON TWITTER @TheElissaPost: HERE

👉LIKE MY FACEBOOK FAN PAGE:HERE

👉FOLLOW BY EMAIL BY PUTTING YOUR EMAIL INTO THE FOLLOW BY EMAIL PLUGIN.